> ## Documentation Index
> Fetch the complete documentation index at: https://docs.clearoffer.io/llms.txt
> Use this file to discover all available pages before exploring further.
# Connect Ashby
> Set up and verify the Ashby integration to automatically create and update offers in ClearOffer.
Connect your Ashby ATS so approved offers in Ashby automatically appear in ClearOffer as unpublished offers that you can review and send.
Approved Ashby offers automatically appear in ClearOffer, with optional custom field mapping.
## Prerequisites
* Ashby admin access (to create an API key)
## Connect Ashby
Go to Ashby and navigate to the Admin panel.
From the left sidebar, click on `Integrations`.
On the Integrations page, search for `ClearOffer`.
Click on the ClearOffer card to open the integration settings, and then click on `Create API Key for ClearOffer`.
Copy the API Key and save it somewhere safe and secure.
Close the API Key modal, then click on `View API Key Settings` button.
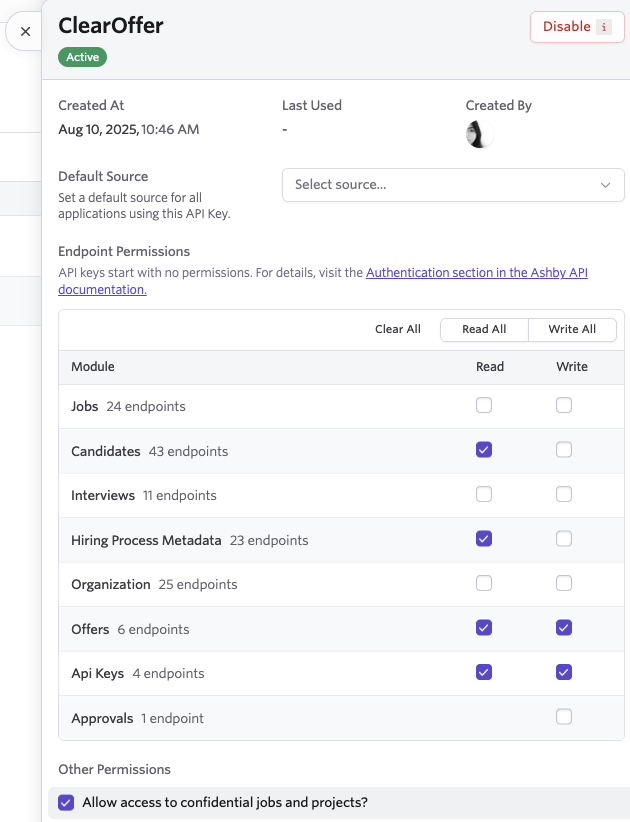
Within the API Key Settings, under `Other Permissions`, check the box for `Allow access to confidential jobs and projects?`, and then click on the `Save` button.
When creating your Ashby API key, if you want to scope the API key based on principle of least privilege, ensure it only has the following permissions:
* Candidate Read
* Hiring Process Metadata Read
* Offers Read and Write
* API Key Read and Write
* “Allow access to confidential jobs and projects?” checked
 Open ClearOffer and click on the `Company` toggle in the sidebar, then click on `Integrations` to open the Integrations page.
In the Ashby card, click `Connect Ashby`, and paste the API key you copied earlier.
Treat your API key like a password. Do not share it in chat or tickets.
Select which Ashby events should sync to ClearOffer:
* Offer Create — create a new ClearOffer when a new offer is created in Ashby
* Offer Update — update the matching offer in ClearOffer when it changes in Ashby
Click `Configure Integration`. ClearOffer will validate your key and automatically create the required webhooks in Ashby.
You should see a `Connected` badge on the Ashby card once setup is complete.
## What gets synced
| Data Type | What Gets Synced |
| ------------- | -------------------------------------------------------------------------------------------------------- |
| Basic Info | Name, email, role, start date |
| Compensation | Base salary, currency |
| Custom fields | Any custom fields you map via Custom Field Mapping (Equity details, department, location, manager, etc). |
Only offers in Ashby that are ready for candidate delivery are synced. Drafts or unapproved offers aren't imported.
## Verify the connection
* Create or approve a test offer in Ashby
* In ClearOffer, check your Offers list for a new unpublished offer
* If Offer Update is enabled, make a small change in Ashby and confirm it updates in ClearOffer
## Troubleshooting
Regenerate the key in Ashby with the required permissions and re-enter it in ClearOffer.
* Confirm the offer in Ashby is approved and ready for candidate delivery (status is `WaitingOnCandidateResponse`)
* Ensure you enabled the relevant event (`Offer Create` or `Offer Update`)
Follow the in-app manual setup steps or contact support with a timestamp of your attempt.
## Next steps
Map your Ashby custom fields to ClearOffer so additional information (like equity details, department, location, welcome messages, etc) is populated automatically.
Map Ashby custom fields to ClearOffer fields to enrich synced offers.
Open ClearOffer and click on the `Company` toggle in the sidebar, then click on `Integrations` to open the Integrations page.
In the Ashby card, click `Connect Ashby`, and paste the API key you copied earlier.
Treat your API key like a password. Do not share it in chat or tickets.
Select which Ashby events should sync to ClearOffer:
* Offer Create — create a new ClearOffer when a new offer is created in Ashby
* Offer Update — update the matching offer in ClearOffer when it changes in Ashby
Click `Configure Integration`. ClearOffer will validate your key and automatically create the required webhooks in Ashby.
You should see a `Connected` badge on the Ashby card once setup is complete.
## What gets synced
| Data Type | What Gets Synced |
| ------------- | -------------------------------------------------------------------------------------------------------- |
| Basic Info | Name, email, role, start date |
| Compensation | Base salary, currency |
| Custom fields | Any custom fields you map via Custom Field Mapping (Equity details, department, location, manager, etc). |
Only offers in Ashby that are ready for candidate delivery are synced. Drafts or unapproved offers aren't imported.
## Verify the connection
* Create or approve a test offer in Ashby
* In ClearOffer, check your Offers list for a new unpublished offer
* If Offer Update is enabled, make a small change in Ashby and confirm it updates in ClearOffer
## Troubleshooting
Regenerate the key in Ashby with the required permissions and re-enter it in ClearOffer.
* Confirm the offer in Ashby is approved and ready for candidate delivery (status is `WaitingOnCandidateResponse`)
* Ensure you enabled the relevant event (`Offer Create` or `Offer Update`)
Follow the in-app manual setup steps or contact support with a timestamp of your attempt.
## Next steps
Map your Ashby custom fields to ClearOffer so additional information (like equity details, department, location, welcome messages, etc) is populated automatically.
Map Ashby custom fields to ClearOffer fields to enrich synced offers.